Scouting Report: Mohammed Fallatah (#6) and Suhayb Al-Hawsawi (#7)
Saudi Arabia U20 · video analysis of three matches against Hong Kong, Oman and Qatar
| Hong Kong | KSA 2–0 | #7 until 64' (goal 27:07) · #6 from 64' |
| Oman | KSA 3–2 | #6 (captain) and #7 full match |
| Qatar | KSA 1–0 | #6 full match (advanced late) · #7 until 66' |
Squad. 20 outfield players and a goalkeeper played for Saudi Arabia across the three matches: #2, #3, #4, #5, #6, #7, #8, #9, #10, #11, #12, #13, #14, #15, #16, #17, #18, #19, #20 and #23. Each match used 10 outfield starters and 5 substitutes. Eight appeared in all three games (#4, #6, #7, #8, #9, #15, #17, #18); only #7 and #9 started all three.
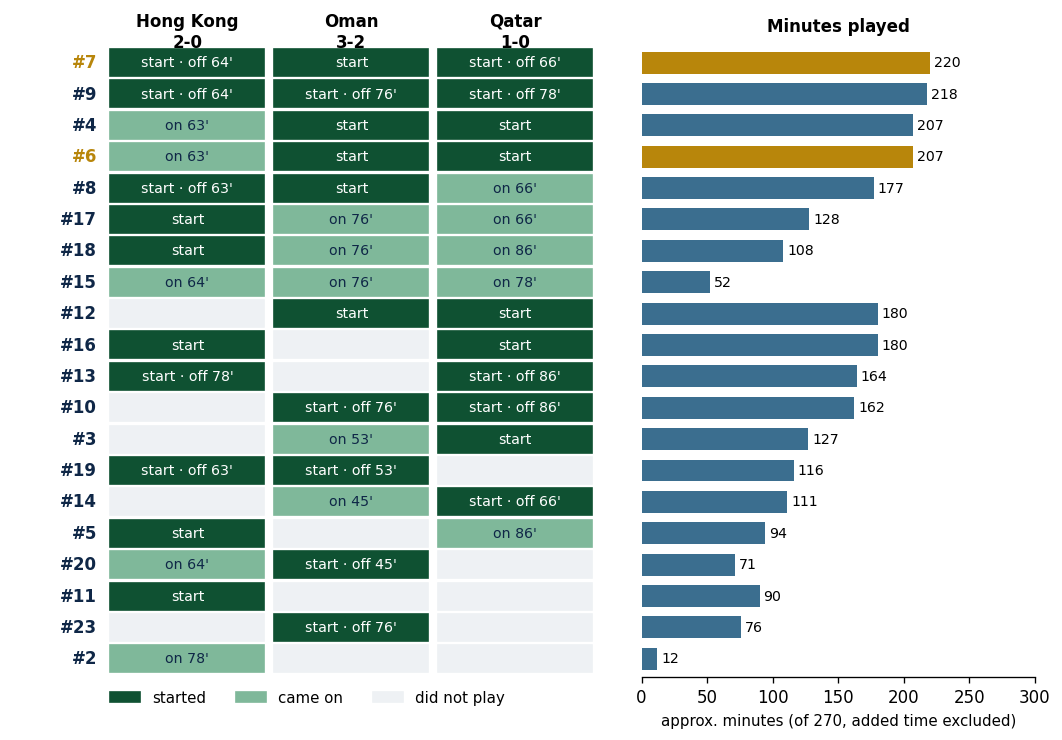
Hong Kong | KSA 2–0
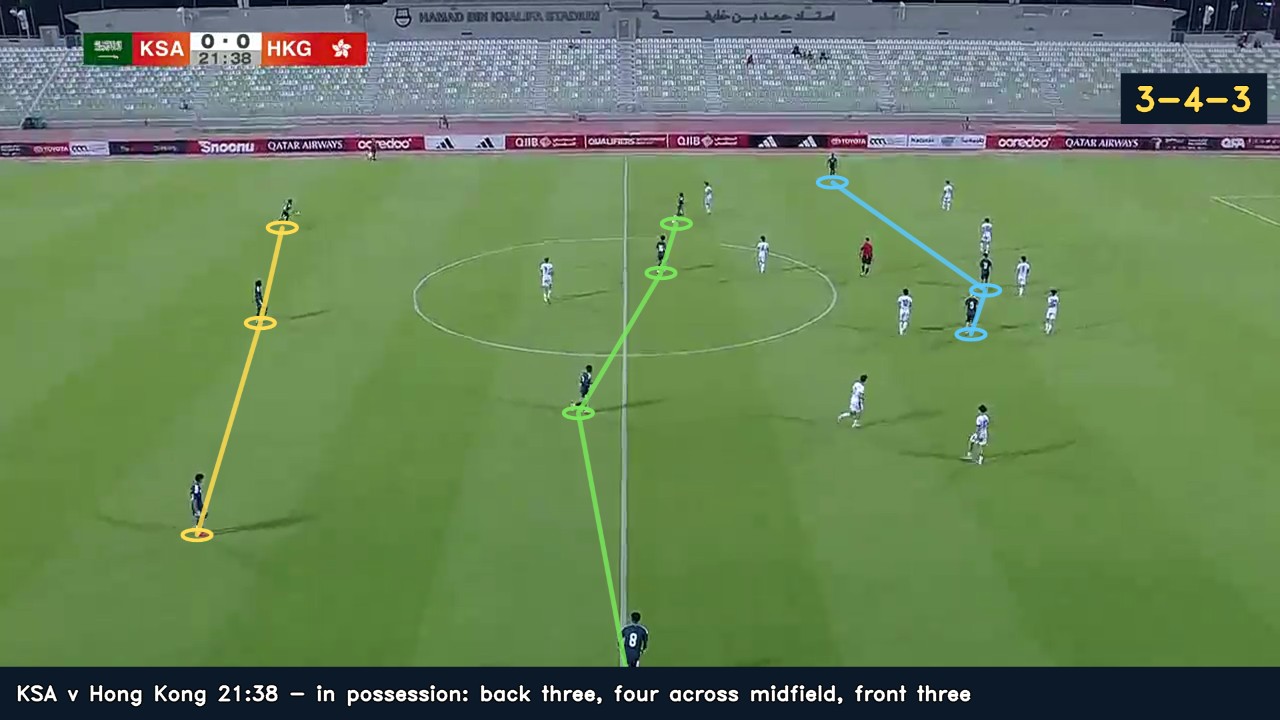
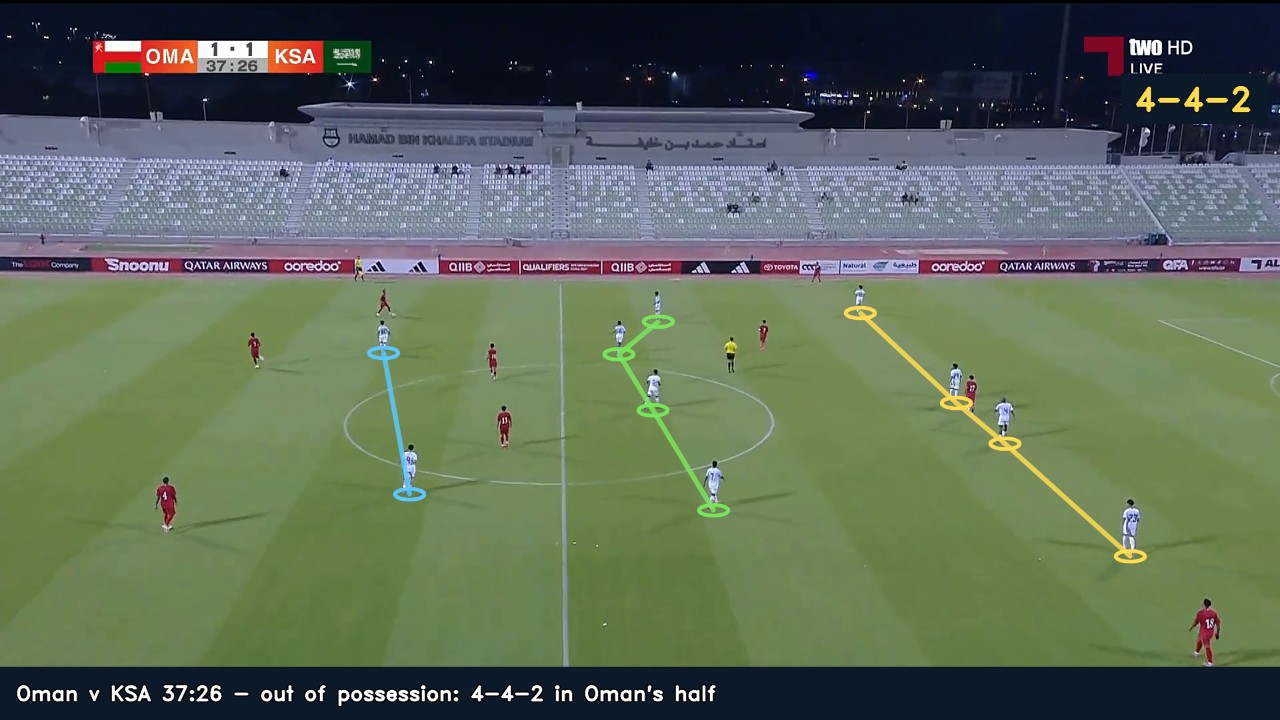
Against Hong Kong's compact 5-4-1, KSA built with three (3-4-3 / 3-5-2) and pressed in a 4-4-2 / 4-2-3-1. Their aggressive opening press produced 14 high turnovers, with #7 scoring at 27:07. KSA shifted to a mid block after the first cooling break, then resumed pressing after half-time. Following four substitutions around 64' (#7 off, #6 on), low-block time rose from 31% to 60%. Hong Kong enjoyed their strongest spell but did not score.
Oman | KSA 3–2
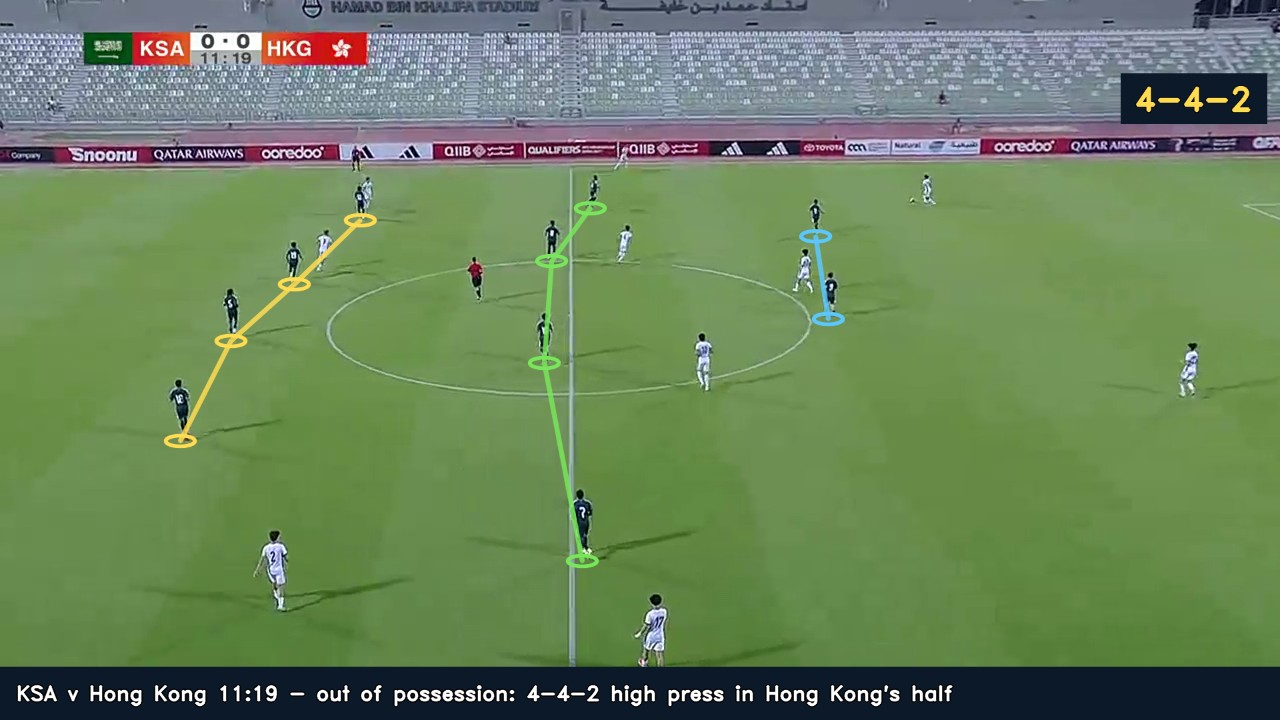
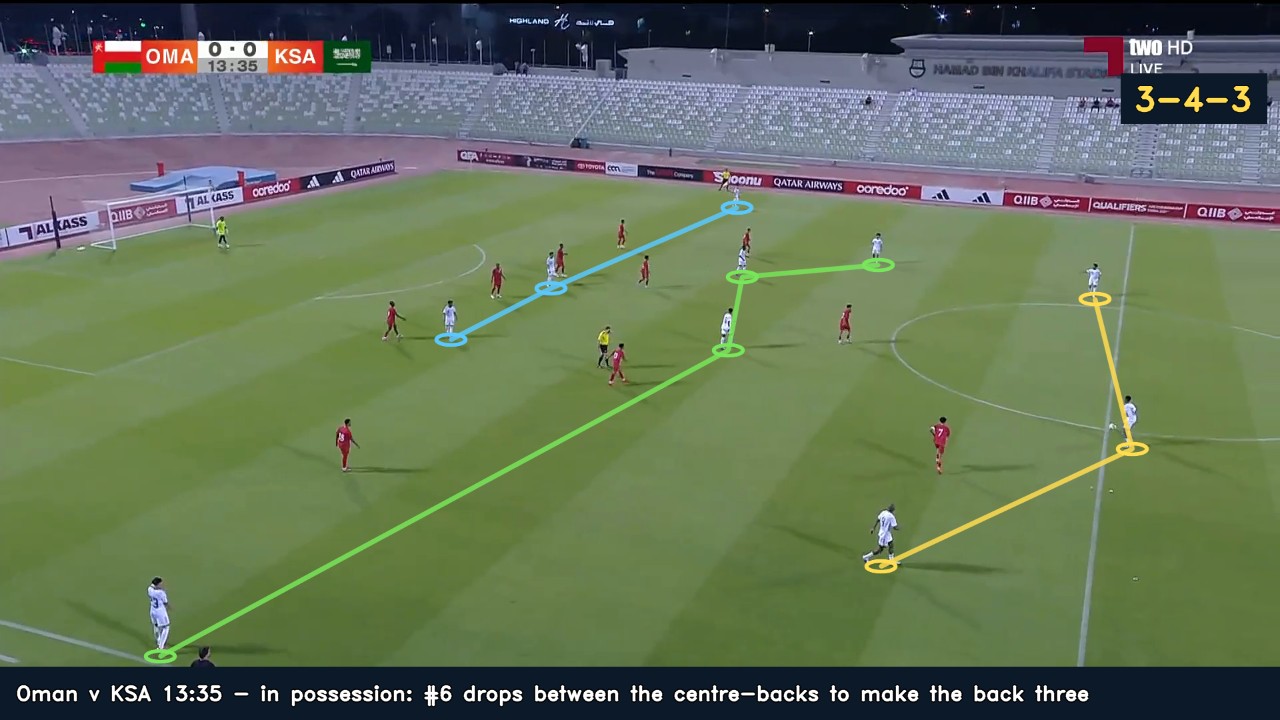
KSA built in an asymmetric 3-4-3, with #6 dropping between the centre-backs and play favouring the right. Without the ball they alternated between a 4-4-2 press, a 4-1-4-1 mid block and a late 5-4-1, struggling to contain Oman's progression. Moving #7 left at 30:43 changed the attacking balance without improving the press. KSA regained the lead at 46:39 and extended it at 65:09 by playing through Oman's press. They then dropped deeper and conceded after #7 lost possession and #6 failed to clear the resulting attack, before holding on in a 5-4-1.
Qatar | KSA 1–0
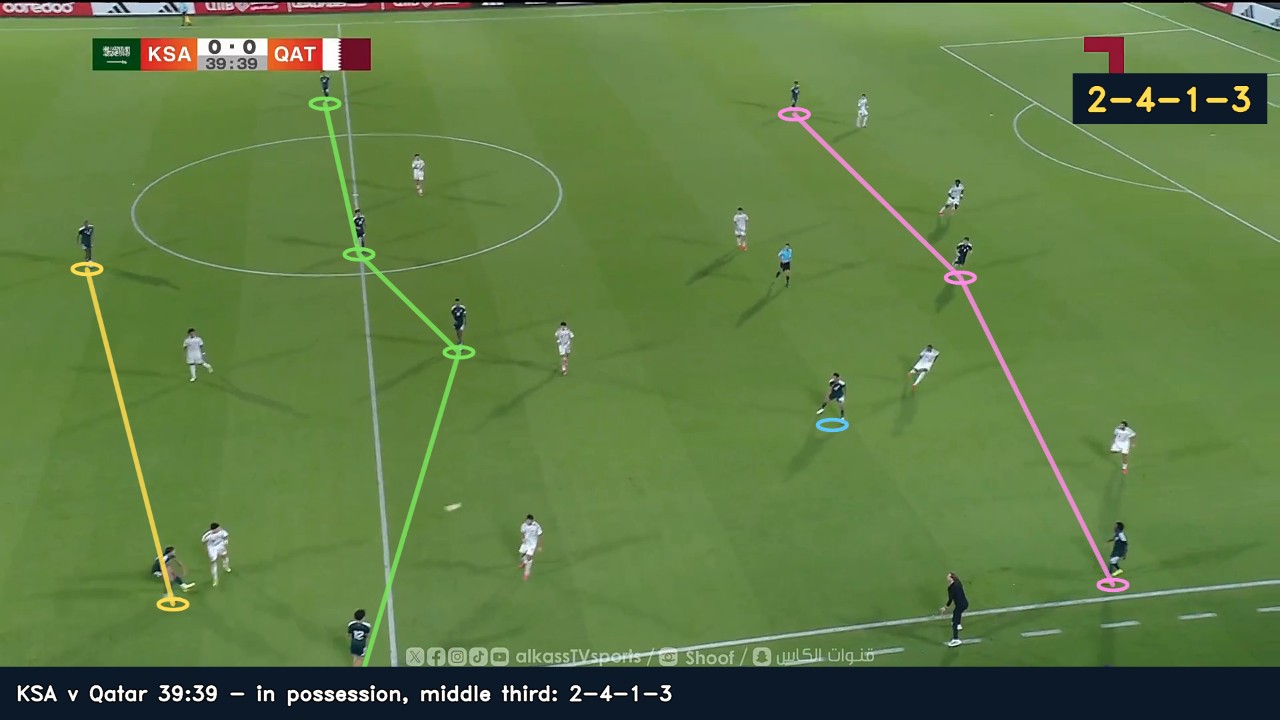
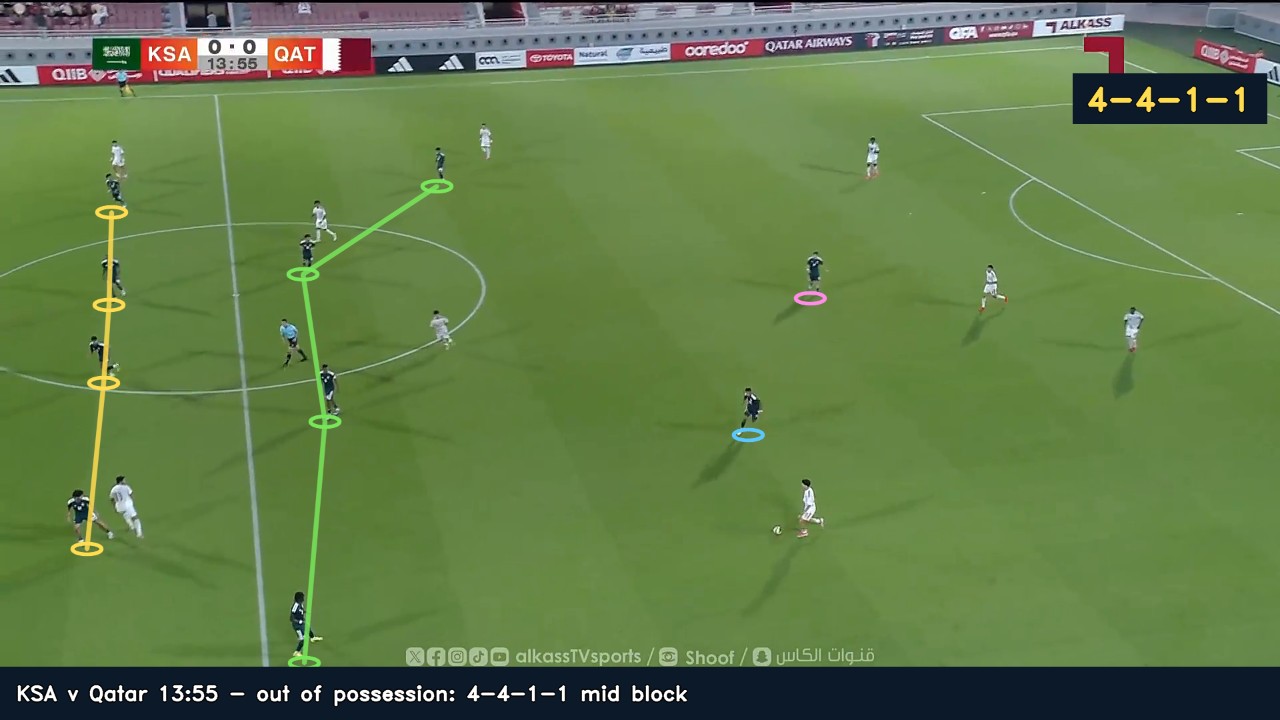
KSA built in a 3-2-5 from deep and a 2-4-1-3 higher up, progressing mainly through #7 on the right. Out of possession, #6 and #16 screened in a compact 4-4-1-1 / 4-2-3-1. Qatar's 2-4-4 press from 24' pinned KSA back, reducing possession to 31%. After the 33:17 cooling break KSA kept their wingers higher, restoring outlets and creating a third-man combination through #7. Changes at 66:11 brought a 4-4-2 press, with #6 stepping alongside #10. KSA scored at 80:19 and defended with a back five from 86:37.
Across the three matches KSA generally built with three and defended with four, adjusting their block height to the opposition and the game state. These changes shaped the responsibilities of both players.
#6 Mohammed Fallatah linked defence and midfield by showing for the ball, playing through lines and screening the central space after possession was lost. His distribution and movement supported progression, but his positioning when KSA dropped left gaps in front of the defence.
#7 Suhayb Al-Hawsawi provided width and progression on KSA's preferred right flank, keeping width before taking on defenders or attacking the space behind. When Qatar pinned KSA back at 24-33', his role shifted towards recovery and defensive support.
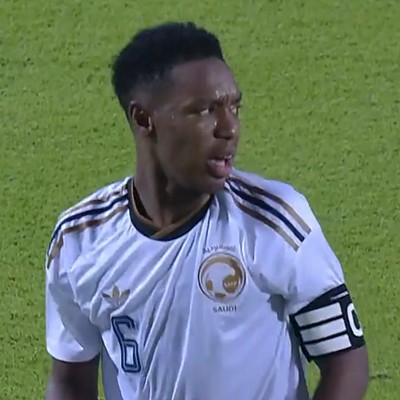
Mohammed Fallatah
Deep-lying central midfielder
| Club | Al-Ittihad (first-team squad) |
| Born | 13 Jul 2007 (19) |
| Height | 184 cm |
| Favourite foot | Right |
| Note | Wore the captain's armband v Oman |
Minutes
| Hong Kong | From 64' (on for #8) | about 26 |
| Oman | Full match | 90 |
| Qatar | Full match | 90 |
KSA U20: Hong Kong (2-0), Oman (3-2), Qatar (1-0).
Profile data: Sofascore / Al-Ittihad; photo: match broadcast.
Role
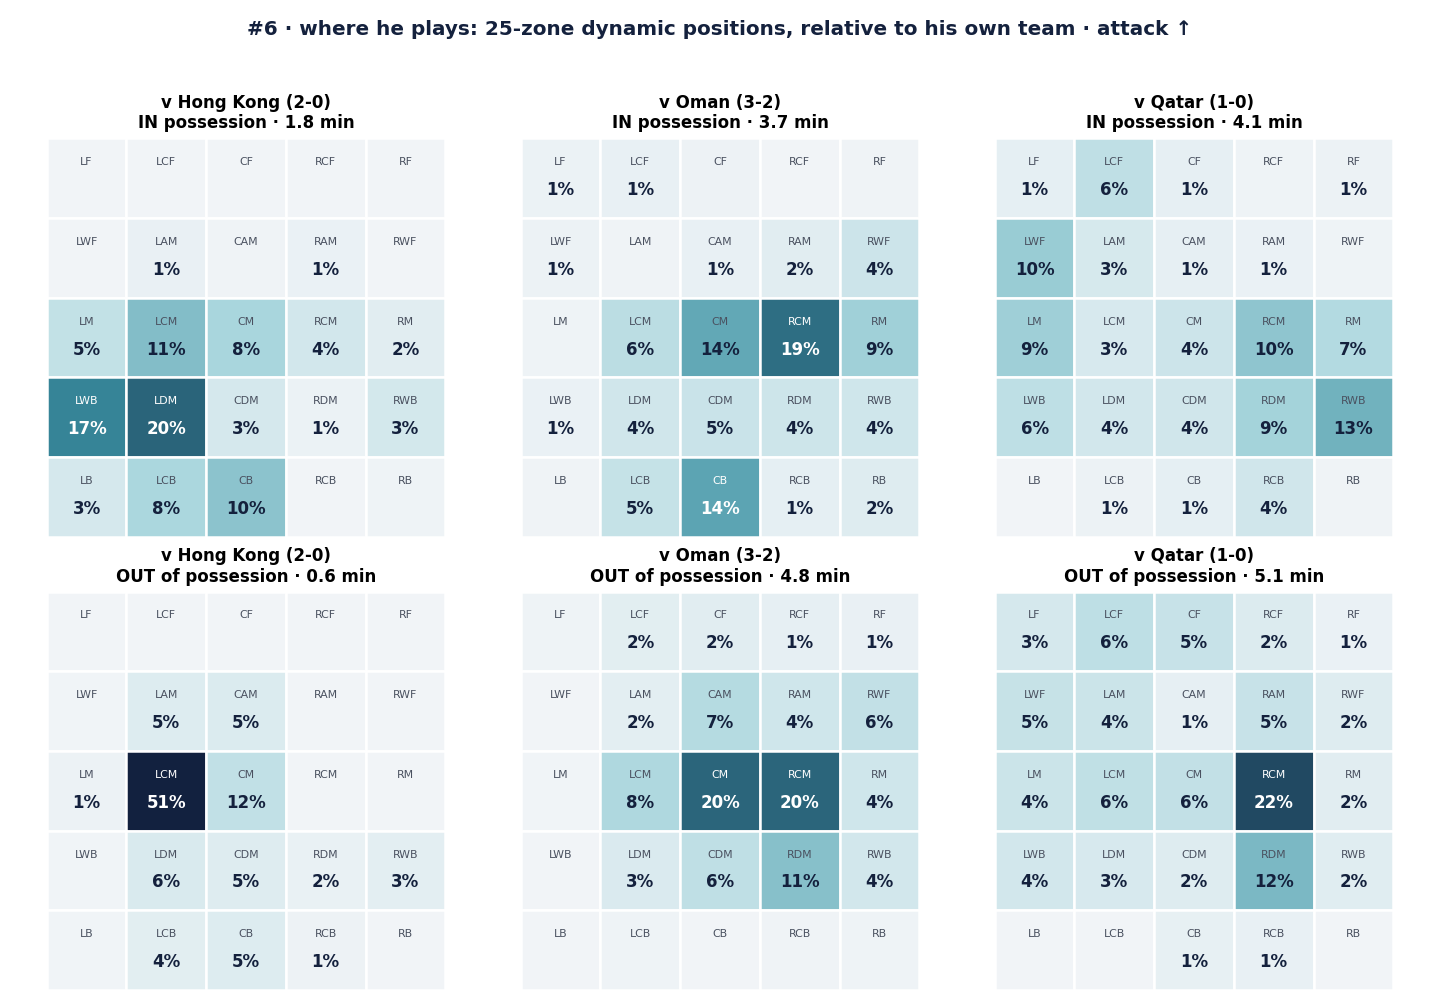
Right-footed deep-lying central midfielder in KSA's back-three build-up. Against Oman he operated as the first-half single pivot, dropping between the centre-backs. Against Qatar he started on the right of the midfield two, moved left after half-time and advanced into the front line late. Against Hong Kong he came on at 64' on the left of the midfield two.
Passing and carrying, per match
| Match | Passes | Forward | Sideways | Back | Carries |
|---|---|---|---|---|---|
| Hong Kong | 8 | 17% | 67% | 17% | 5 |
| Oman | 22 | 39% | 50% | 11% | 12 |
| Qatar | 25 | 57% | 17% | 26% | 12 |
| All three | 55 | 45% | 36% | 19% | 29 |
Where his passes go
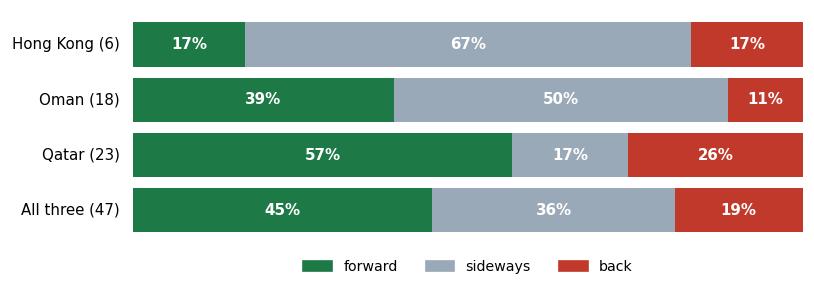
Counted on the video in his minutes on camera (not match totals); direction shares from the passes whose direction is visible.
How he reacted to each game
- Hong Kong · KSA 2-0
- On at 64' as KSA dropped into a deeper block after the four changes: he played on the left of the midfield two and stayed deep out of possession, the screen in front of the back line.
- Most of his watched moments in this spell are positive (protecting the ball, releasing at once, the support run into the box).
- Oman · KSA 3-2 (away)
- After the 0-1 (17:07) KSA pressed tighter: his most intense spell of the match.
- He played left of centre until the press was pushed up at 53:28 (#3 on for #19); from then he was on the right of the midfield two, and he stepped up with the press: the highest he stood out of possession in the match.
- After the 1-3 KSA dropped (65:09): three negative moments in eight minutes, the spell of the 2-3 goal, where he is late to close the gap.
- Qatar · KSA 1-0
- Before Qatar's change (0-24') he played on the right of the midfield two, with the most positive watched actions of any spell.
- Qatar's 2-4-4 press (24') pushed him back by about six metres in and out of possession, and his positive-to-negative ratio fell.
- From 55' he played on the left; in the 4-4-2 press after the 66:11 changes he jumped from the left into the first line, and after #15 came on (78:55) he stood highest of the match out of possession.
- In the closing back five (86:37) his high-intensity running rose to its peak of the three matches.
Where he plays · 25-zone dynamic positions
Passes and carries
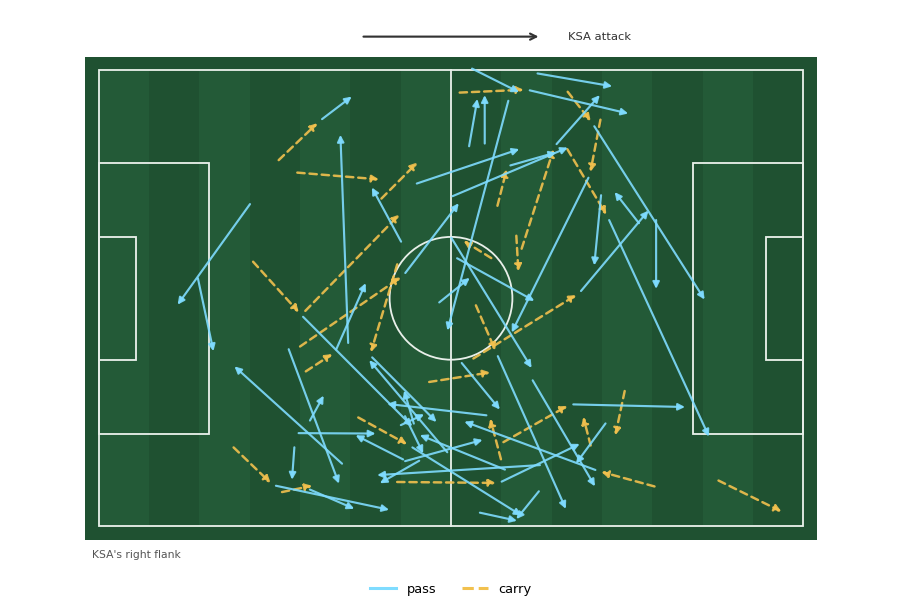
Where his passes and carries go (tracking).
Physical profile · rank in the KSA squad
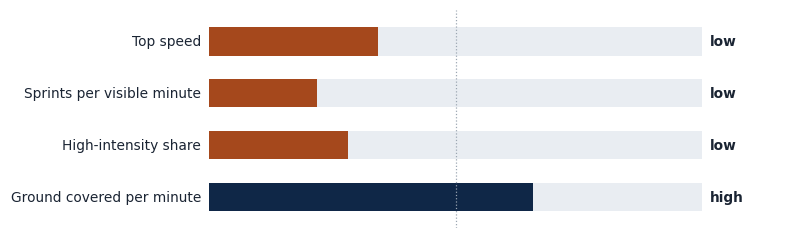
Covers ground steadily (upper half of the squad on camera) but sprints rarely; still makes long runs late in games (about 50 metres at 93:39 v Qatar).
The four corners
Tactical
In possession. Regular build-up outlet: shows for the ball in front of his box or between the centre-backs under pressure, carries into open central space (44:15 v Oman) and checks his shoulder before receiving (62:03 v Qatar).
Play through lines / switch play. Draws the press before playing through lines (12:38 v Qatar) or switching play with a long diagonal (58:57 and 17:58 v Qatar, 73:57 v Oman).
Support run. Runs from deep after releasing the ball, reaching the box (81:33 v Hong Kong) or the pocket outside it against a closed block (93:07 v Oman).
Out of possession. Times his press to force the carrier backwards (20:27 v Qatar, 19:26 v Oman) and closes space on the carrier's inside.
Transitions. Tracks back over long distances towards his box and gets across to the carrier (4:55 v Qatar, 2:40 v Oman). After regains he reacts first to loose balls and releases a team-mate quickly.
To improve · defensive positioning. Leaves gaps behind him and reacts late to close the space in front of the back line (41:21 v Qatar, 75:18 v Hong Kong, 26:13 v Oman). At 68:23 v Oman the central space stayed open in the move that led to Oman's second goal.
To improve · forward progression. At times recycles possession despite having time and an open forward option (10:04 v Qatar, 64:53 v Oman).
Technical
Passing. Secure distribution with range: about nine in ten passes reach a team-mate (55 passes in about 82 minutes on camera). More than half travel 15 m or more, including switches of play (58:57 and 17:58 v Qatar, 73:57 v Oman) and a pass through the lines to #7 (12:44 v Qatar). Nearly half go forward. All four misplaced passes came against Qatar, including a long ball collected by the keeper (68:03).
Shield ball / turn away from pressure. Shields the ball and brushes off challenges (84:42 v Hong Kong, 84:35 v Oman). Pressed from behind or from two sides, he turns away and carries out (16:17 and 35:23 v Oman, 7:56 v Qatar); 29 carries in total.
Ground duels. Wins most contested 50-50 ground duels (24 won, 5 lost).
Dribbling. Rarely takes players on (2 take-ons, both won).
Physical
Running profile. Covers ground consistently, in the squad's upper half on camera, but sprints infrequently and is not among the quickest; his recovery runs rely on distance rather than explosiveness.
Work rate. Keeps his effort late, chasing until he regains possession himself (24:31 v Oman) and making an approximately 50 m support sprint in stoppage time (93:39 v Qatar).
Psychological
Confidence / self-belief. Shows for the ball in tight spaces near his own box or between the centre-backs despite pressure (44:15 v Oman, 62:03 v Qatar). Captained KSA against Oman.
Resilience / recovers after challenge. Gets up after being brought down and contests the next action (30:12 v Qatar, 83:25 v Hong Kong).
Poise and composure. Pressed from behind or from two sides, he turns away and carries out rather than forcing a pass (16:17 and 35:23 v Oman, 7:56 v Qatar).
Decision-making under pressure. Mixed: plays through lines under pressure (12:38 v Qatar) but sometimes recycles despite an open forward option (10:04 v Qatar, 64:53 v Oman).
Tactical · In Possession
A deep-lying midfielder who shows for the ball and provides angles around the carrier, draws the press and plays through lines or switches play, then runs from deep into the pocket in front of the box or into the box itself. To improve: with time and a forward option on, he sometimes plays it safe.
Shows for the ball and finds space to provide / make angles, checking his shoulder before he receives; he runs from deep into the pocket in front of the box to receive, and after releasing the ball he makes the support run, at times into the box.
Clip descriptions
- Oman v KSA 44:15 · show for the ball · find space intelligently: #6 shows for the ball in front of his box and receives it (44:15) with an Oman player closing behind him, moves away from him and drives through the open central zone of midfield, about 25 metres to the centre circle, with Oman players chasing (44:17-44:22).
- KSA v Qatar 62:03 · scan / check shoulder · turn away from pressure: At 61:55, #6 is on the left touchline in the Qatar half; he takes the throw-in to #13 (62:01) and gets the return (62:03). Before the ball arrives he checks over his shoulder, with QAT#17 closing from behind; he turns away from him, carries it infield off the line and passes inside (62:06), and KSA move it on to #12 (62:08).
- KSA v Hong Kong 64:57 · provide / make angles: #6 moves out from the centre into the open space inside the carrier, about 8-10 metres from the nearest HK player, to give him a passing angle (64:54-64:57). He receives (64:57); an HK player steps up to about 3 metres and #6 plays it inside, about 20 metres across to a team-mate in the centre (64:59-65:01), so KSA move the ball away from the touchline.
- KSA v Qatar 57:41 · show for the ball: Near halfway Qatar close him in a small space by the line; #6 comes across to offer, and #7 and #6 exchange short passes (57:48-57:49), with #16 also involved, #7 keeping the ball each time. He carries on into the Qatar half (57:52), about 35 metres from where he started, and KSA still have the ball at 57:54 after a Qatar player goes down in the duel by the line.
- KSA v Qatar 46:30 · find space intelligently · hold off / ball protection: #6 offers in open space inside him, moving into it at about 15 km/h, and the ball reaches him (46:32). He takes it on, holds off QAT#20's lunging challenge (46:33) and keeps it, but carries it towards the right touchline, where QAT#3 gets to it (46:35) and play stops.
- KSA v Qatar 43:21 · show for the ball · run from deep: After a Qatar touch, #12 recovers it, and #6, who shows for the ball in open space on the left of his own half, receives (43:31-43:32). He turns away from QAT#15, runs with it about 20 metres to halfway and plays it to a team-mate on the left touchline (43:35), then keeps running at sprint speed (about 30 km/h) into the Qatar half. He gets it back (43:39) and plays it down the line for #9, but QAT#23 gets there first near the box (43:41).
- Oman v KSA 93:07 · run from deep · find space intelligently: #6 sees the space and runs forward from midfield, about 18 metres at up to 19 km/h, into the open pocket in the left half-space between Oman's midfield and back lines (93:07-93:09). The ball is played inside to him and he takes it on the run (93:09-93:10), driving at the edge of the Oman box with defenders converging on him. A team-mate goes down beside him, the ball is contested at the edge of the D and it runs through to the Oman keeper, who goes down to gather it (93:13-93:14).
- KSA v Hong Kong 81:33 · support run: #6 moves up to the left corner of the HK box area and receives (81:32) with HK players 1-3 metres around him; he lays it off infield at once (81:33-81:34) and sprints straight into the box at about 24 km/h (81:34), arriving inside the area beside his marker (81:36-81:38). The ball is moved on to the other side (81:36) and does not come back to him: an unrewarded run.
- KSA v Qatar 58:45 · time pass / release the ball · support run: At 58:45, #6 receives from #13 on the left touchline in the Qatar half with a Qatar player closing. He plays it first down the line to #10 before the pressure arrives and runs forward at about 23 km/h in support (58:48). Qatar close the line and KSA recycle back to #13 (58:51).
Opens the passing line, draws the press to the ball and plays through lines into the team-mate beyond the press or the midfield line, or switches play with the long diagonal to the free side.
Clip descriptions
- KSA v Qatar 58:57 · open passing lines · switch play: At 58:56, as KSA recycle to #4, #6 moves off the left touchline into the half-space to open a passing line for him, receives (58:57), carries it infield with Qatar players around him and switches play with a long diagonal pass, about 45 metres, to #7 alone on the right touchline (59:03). #6 follows up to the edge of the box.
- Oman v KSA 73:57 · switch play: At 73:49, KSA and Oman fight for the ball by KSA's left touchline just inside the KSA half; #6 is in a tussle with OMA#13 beside it and breaks away from him at 16-18 km/h as KSA win it (73:52-73:53). He receives the ball forward near halfway (73:55) with an Oman player chasing him, carries a few metres and hits a long diagonal pass, about 50 metres, across the pitch into the open space on the right (73:57).
- KSA v Qatar 17:58 · switch play · diagonal pass: At 17:58, #7 lays it inside to #6 on the right of KSA's half. #6 takes it forward a few metres with a Qatar player closing him and switches play with a long diagonal pass, about 50 metres, to the far left side, into the Qatar half (18:03).
- Oman v KSA 45:49 · play through lines · diagonal pass: At 45:45, #6 receives in the right half-space of his own half, just short of halfway, with no Oman player close. He takes a touch forward and at 45:49 plays a diagonal ball of about 40 metres along the ground into the space behind the Oman midfield on the right; an Oman player slides and misses it.
- KSA v Qatar 12:38 · draw to ball · play through lines: At 12:38, #6 has the ball back on the right of his own half; he waits about six seconds, draws the press to the ball and plays through the lines into #7 (12:44), who receives facing goal.
With time on the ball and a forward option available, he sometimes turns back and recycles instead of trying the ball in behind or the pass to the man ahead. Each clip freezes at his decision and marks the space that was open.
Clip descriptions
- KSA v Qatar 10:04 · plays it safe: At 10:04, #6 gets the ball back from #7 with no one near him for several seconds, while #9 and #10 stand on the Qatar back line with space behind it; he plays short back to #7 (10:08): the ball in behind is not tried.
- Oman v KSA 64:52 · plays it safe: With OMA#15 about 2 metres from him he holds it on the line and lays it back to #6, free about 22 metres from goal on the right (64:52). Two KSA players are inside the Oman box. #6 turns away from goal instead, carries back towards halfway with OMA#19 closing behind him (64:53-64:56) and passes about 25 metres back to #3 on halfway (64:59): the attack restarts from the middle.
- KSA v Hong Kong 84:14 · plays it safe: At 84:13, after a stoppage, a team-mate gives the ball to #6 on the left of the Hong Kong half, about 45 metres from goal, with the nearest HK player about 5 metres away. #17 is wide on the left touchline about 18 metres ahead of him, with the nearest HK defender about 7 metres from #17; #6 turns back instead and plays it back and across into his own half, about 30 metres (84:15-84:17). KSA work it back to him (84:22) and he then plays it forward down the left line (84:23); #15 has it at 84:26.
Tactical · Out Of Possession
Steps out and shows the carrier the way back; stays goal-side of the carrier and covers the gap in front of the back line, so the centre stays shut. To improve, and his main drawback: he is late to close the gap in front of the back line; at times he also stands off the carrier and lets him pick his pass.
Steps out from midfield to engage the carrier as he receives or comes inside; he shuts the way to the centre, makes him turn back, and at times wins the ball himself.
Clip descriptions
- KSA v Qatar 20:27 · step out · show the way to go: #6 steps out to QAT#20 as he receives and goes shoulder to shoulder with him (20:27), #20 keeps the ball but has to turn away from the KSA goal and carry it back towards halfway: the pressure stops his forward run.
- Oman v KSA 56:53 · step out · get across to: #6 gets across from the centre and steps out to him (56:53), staying on his goal side, so the line towards the KSA goal is shut and #19 has to turn and carry the ball back towards his own half.
- Oman v KSA 19:26 · choose the pressing moment: #6 runs in at about 20 km/h, steps between the two Oman players as the ball arrives and pokes it loose (19:26); it runs to #8 (19:27) and KSA have it back about 7 metres inside the Oman half.
- Oman v KSA 66:40 · choose the pressing moment: #6 waits about 9 metres off him, then steps in at 15 km/h as he comes inside and pokes the ball away from him (66:40). The loose ball runs on into the Oman half and Oman have it again on the far touchline (66:45).
Protects the centre: he stays goal-side of the carrier, covers the gap in front of the back line and closes the central lane, so the ball often has to go wide.
Clip descriptions
- Oman v KSA 79:13 · positioned to close space · force long / force wide: #6 is on him at once, about 3 metres away and on the goal side. As OMA#13 carries across towards KSA's right (79:14-79:15), #6 follows him step for step inside, so the central lane through midfield towards the KSA back line stays shut and he cannot turn forward. OMA#13 has to play it wide to OMA#15 on the right touchline (79:16).
- Oman v KSA 49:52 · track back · get across to: At 49:52, OMA#17 collects the ball in the centre circle beside #6 and carries it towards halfway; #6 turns and runs back with him on his inside, between him and the centre, while Oman move the ball wide to OMA#7 on KSA's right (49:55). #6 keeps running back with the break, about 30 metres (from x 62 to x 36, 49:52-49:58), and gets across to about 4 metres inside OMA#7, so the way from the wing into the centre in front of the KSA box is closed; the clip ends with the attack still on (50:01).
- KSA v Hong Kong 75:52 · track back · positioned to close space: This time #6 turns and runs at up to about 17 km/h to the HK player on the ball, gets to within about 2 metres of him (75:53-75:54) and runs with him on his goal side; the ball is moved out wide to the left corner area of KSA's half (75:56), away from the centre.
- KSA v Qatar 13:56 · cover space / gap in defence: At 13:56, Qatar break down KSA's right; while #7 closes QAT#3 by the touchline, #6 covers the space inside him, so the way into the centre is shut until play stops (13:59).
His main defensive drawback: he is late to close the gap in front of the back line. When the ball moves or the opponent breaks, the central zone between him and the KSA box stays open and he arrives after the carrier or not at all; when he engages the carrier he can stand off him and let him carry into the space. Against Oman the late closing ends in a goal.
Clip descriptions
- KSA v Qatar 41:21 · fails to cover: At 41:21, QAT#20 has the ball about 4 metres from #6 in KSA's half; #6 does not close him and Qatar move it out to the KSA left (41:24), with #6 following that way. Qatar then switch to the other side (41:28) and QAT#3 carries from the right towards the KSA box (41:30-41:31). #6 jogs beside it instead of closing it: the central zone in front of the KSA back line, between him and the ball, is left open for Qatar (41:31).
- KSA v Hong Kong 75:18 · fails to cover: At 75:14, Hong Kong break down KSA's left: HKG#6 carries along the touchline and HKG#21 takes it on towards the corner of the KSA box (75:18-75:20). #6 runs back from midfield at up to about 18 km/h (75:17-75:18), then slows to a jog (6-7 km/h) outside the box, about 15-20 metres from the ball (75:21-75:23). The zone in front of the KSA box, between him and the ball, stays empty of KSA shirts while HK players (#21, #11) stand free in it; KSA's defenders deal with it at the box (#17, 75:25).
- Oman v KSA 30:34 · poor recovery / poor anticipation: #6 is still beside the centre circle in his own half, and the whole zone in front of the KSA box, between him and the goal, is empty. He is late to start his run back; Oman's attack reaches the byline (30:41) before he is in that zone, and the ball goes out of play at 30:42.
- Oman v KSA 26:13 · leave gaps · poor recovery / poor anticipation: At 26:10, OMA#13 carries the ball through the middle towards the KSA box, into the gap between #6 and the KSA players to his right. #6 is late to close it: he only gets across into #13's path about 8 metres outside the KSA area (26:13), where #13 goes to ground beside him and the ball runs on to the keeper (26:14).
- Oman v KSA 72:19 · allows too much space: #6 is the nearest KSA player: he runs back in front of him but stays 4-6 metres off for more than ten seconds (72:19-72:31), so the space around the ball is never closed and #13 can lift his head and pick his pass. When #6 does step in (72:33), #13 turns away from him into the open zone in front of the KSA box (72:35-72:37).
- KSA v Qatar 88:36 · allows too much space: At 88:34, Qatar play out of their half; QAT#17 receives on the halfway line about 4 metres from #6 (88:36) and carries past him into the KSA half while #6 follows at a jog. A KSA defender takes it off #17 near the KSA box (88:38).
- Oman v KSA 68:23 · leave gaps · poor recovery / poor anticipation: #6 runs back to the edge of his own box (68:18-68:22), with OMA#18 and OMA#7 free around him (68:21). At 68:23 the ball drops to him at the edge of the area and runs off him to OMA#7 (68:24); the space beside him at the edge of the box is open and he is late to close it. Oman move it between OMA#7 and OMA#18, and #18, alone in the centre about 12 metres out, finishes first time (68:29): 2-3.
Tactical · Transitions
Tracks back over long distances to the danger zone near his own box and gets across to the carrier; gets to the loose ball first, wins it and releases a team-mate.
Runs back over long distances to the danger zone near his own box and gets across to the carrier; in these clips he tackles, blocks, or gets to the loose ball first.
Clip descriptions
- KSA v Qatar 4:55 · track back · well-timed tackle: #6 tracks back about 30 metres down the touchline at full speed, covers the space behind the full-back, catches QAT#11 near the corner of the KSA box and wins the ball with a well-timed tackle in a running duel (4:59-5:00).
- Oman v KSA 2:40 · well-positioned to block: At 2:40, #6 is at the right corner of the KSA box, where the Oman attack is heading; he faces the Oman player on the ball and gets a foot in to block his ball into the box. He then steps out to the loose ball at the edge of the area (2:43); Oman keep it and work it into the box on the right while #6 holds the space at the edge of the area, until #12 wins it (2:49).
- Oman v KSA 25:33 · track back · get across to: #6, near halfway in the centre, turns and sprints back about 25 metres on a diagonal (25:33-25:36, up to 27 km/h) to the ball on KSA's right, about 17 metres from his own box. He and a team-mate close the Oman carrier together, the carrier goes down and KSA have the ball for a moment (25:37), but a second Oman player wins it straight back (25:38) and Oman keep it around the KSA box until 25:45.
- Oman v KSA 13:49 · track back · get across to: #6 turns and sprints about 20 metres back and across at up to about 30 km/h, and arrives at the Oman receiver on the touchline near halfway as the ball reaches him (13:52), then runs with him into the KSA half (13:53-13:55). The receiver's ball forward runs through to KSA's goal line (13:57).
- KSA v Qatar 87:16 · track back · read the opposition's pass: At 87:16, in the centre circle, #6 looks at the Qatar carrier, reads his pass down KSA's near side and turns to run toward the receiver (87:18). He tracks back alongside him at full speed (about 24 km/h) and gets a touch on the ball (87:20). As Qatar play it on to QAT#17 by the line, he reads the pass and runs straight into him (87:25); #17 rides the challenge and goes on towards the byline, and KSA's #5 ends up with the ball in the box (87:29). In all, #6 tracks back about 45 metres.
- KSA v Qatar 64:03 · track back · get to loose passes quickly: #6 runs back through the centre circle at up to 25 km/h; KSA win it back (#13, 64:01), #6 gets to the loose ball first on the run (64:03), carries it forward and plays a forward pass, about 25 metres, to #10 on the left (64:05).
Gets to the loose ball first or wins it with a tackle, then keeps the ball moving: he carries forward and releases a team-mate, or keeps possession for KSA.
Clip descriptions
- KSA v Qatar 72:44 · get to loose passes quickly · time pass / release the ball: At 72:44, after a scramble on the far touchline in the KSA half, #6 picks up the loose ball at the centre circle, just inside the Qatar half. He takes it on the move and carries it about 20 metres at pace with a Qatar player chasing him, then releases #9 to his left at the edge of the box (72:50) and keeps running in support. QAT#5 challenges #9 and Qatar win it in their box (72:52).
- Oman v KSA 60:35 · well-timed tackle · time pass / release the ball: #6 steps out from in front of his defence at full speed (about 21 km/h), meets him and wins the ball with a tackle (60:35); the Oman player goes to ground and play goes on. #6 takes it in stride and carries it over halfway with an Oman player chasing (60:36-60:39), releases #7 on the right (60:40-60:42) and keeps running forward in support, about 25 metres more, towards the Oman box.
- Oman v KSA 5:26 · get to loose passes quickly: At 5:26, after a scramble in the KSA box, #6 gets to the loose ball first at the edge of the area and takes it on the run, carrying it about 10 metres out of the zone in front of his box (5:26-5:29). He then plays it forward to a team-mate near halfway (5:30), where the ball is contested with Oman (5:31-5:33).
Technical
A secure passer with range (about nine in ten passes reach a team-mate; more than half travel 15 m or more). Shields the ball in contact, brushes off challenges and turns away from pressure to carry out of the press.
Protects the ball with his body and brushes off challenges to keep it; under pressure from behind or from two sides he turns away from pressure and carries out of the press.
Clip descriptions
- KSA v Hong Kong 84:42 · shield ball: #6 gets to it (84:42) with three HK players (HKG#11, HKG#21 and one more) within 1-3 metres. He keeps it on the line with his body between the ball and HKG#11, rides the challenges and comes out of the scramble with the ball (84:43-84:44), then plays it back along the line to the free team-mate behind him (84:46).
- Oman v KSA 84:35 · brush off challenges: #6 gets to it first (84:35) with an Oman player challenging from behind; he rides the challenge, keeps the ball and carries it about 13 metres forward into the Oman half (84:36-84:38). Then he slips #15 into the space behind Oman's midfield line, about 20 metres from goal (84:39).
- Oman v KSA 16:17 · turn away from pressure · play out of pressure: #6 pushes up into the right half-space, about 35 metres from the Oman goal, and receives at 16:17 with OMA#7 closing to about a metre and #19 coming at him from about 5 metres. He protects the ball, turns and carries forward out of the trap between the two (16:17-16:19); the move goes on and KSA are attacking the Oman box at 16:21, with #6 in a support position about 25 metres out.
- Oman v KSA 35:23 · play out of pressure · stay upright: #6 moves across towards the left at up to 23 km/h to show for the ball, and #23 plays it inside to him at the edge of the box (35:23) with OMA#7 pressing him. OMA#7 gets a touch in the 50-50 (35:24), but #6 comes out of it with the ball and carries it out of KSA's defensive third through the open central lane, about 25 metres to the centre circle, with Oman players chasing (35:25-35:29). At halfway he rides a challenge, stays on his feet and keeps it (35:30), then plays it back to a team-mate (35:32).
- KSA v Qatar 7:56 · turn away from pressure: At 7:56, #6 receives from #12 in his own half with QAT#20 on his back. The ball is briefly contested, #14 helps, and #6 gets it back (8:00), turns away from pressure and drives forward through midfield before releasing #7 down the right (8:04).
Physical
Work rate: he keeps chasing until he wins the ball back, and repeats long runs late in games.
Work rate: he keeps chasing until he wins the ball back himself, and in stoppage time still sprints about 50 metres to support the attack.
Clip descriptions
- Oman v KSA 24:32 · work rate: At 24:31, Oman win the ball off #6 and break. He keeps chasing the ball while running back (24:32-24:36), stays goal-side of OMA#13 so the way through the middle is shut, and #13 has to move it on to #18 on KSA's left (24:38). #6 runs straight into #18, closing him from about 4 metres to 1, and wins the ball himself (24:41).
- KSA v Qatar 93:39 · work rate · run from deep: #6 breaks out of the box at once and sprints about 50 metres up the pitch (up to 28 km/h, 93:46). He receives in the Qatar half (93:52), keeps it when a Qatar player challenges (93:53), plays it wide to a team-mate on the far touchline (93:56), gets it back and carries it towards the Qatar corner flag (93:58). QAT#5 contests it there (94:01); KSA are still on the ball by the Qatar byline at 94:03.
Psychological
Recovers after challenge: when he goes down in a duel he is straight back up and contests again. He captained KSA against Oman.
When he goes down in a duel he is straight back up and contests again; he does not hide under pressure.
Clip descriptions
- KSA v Qatar 30:12 · recovers after challenge: At 30:12, the ball comes back to #6 and QAT#15 closes him at once; they tangle and both go to ground (30:13). #6 is straight back up and stays in the duel with #15 (30:15-30:16), then chases towards QAT#20 as the ball runs on; it ends with #14 (30:18).
- KSA v Hong Kong 83:25 · recovers after challenge: #6, about 30 metres from goal on the left, gets to the second ball first (83:25); two HK players close him at once (about 2 metres), he goes down in the contest, gets back up and keeps fighting HKG#11 for it (83:26-83:28). The ball breaks loose towards midfield, where a KSA team-mate picks it up (83:30).
Next viewing test: does he close the gap in front of the back line within 2-3 seconds of the ball moving?
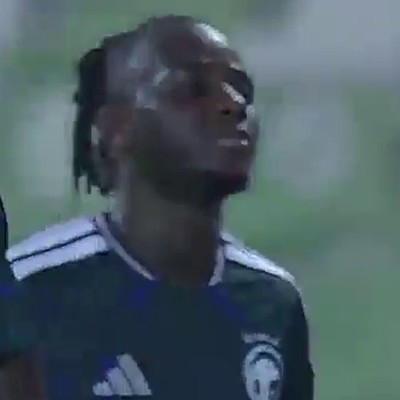
Suhayb Al-Hawsawi
Right winger (inverted)
| Club | Al-Ittihad U19 |
| Born | Age 19 |
| Height | not listed |
| Favourite foot | Left |
| Note | Scored v Hong Kong (27:07) |
Minutes
| Hong Kong | Until 64' (off for #15) | about 64 |
| Oman | Full match | 90 |
| Qatar | Until 66' (off for #17) | about 66 |
KSA U20: Hong Kong (2-0), Oman (3-2), Qatar (1-0).
Profile data: YSScores; photo: match broadcast.
Role
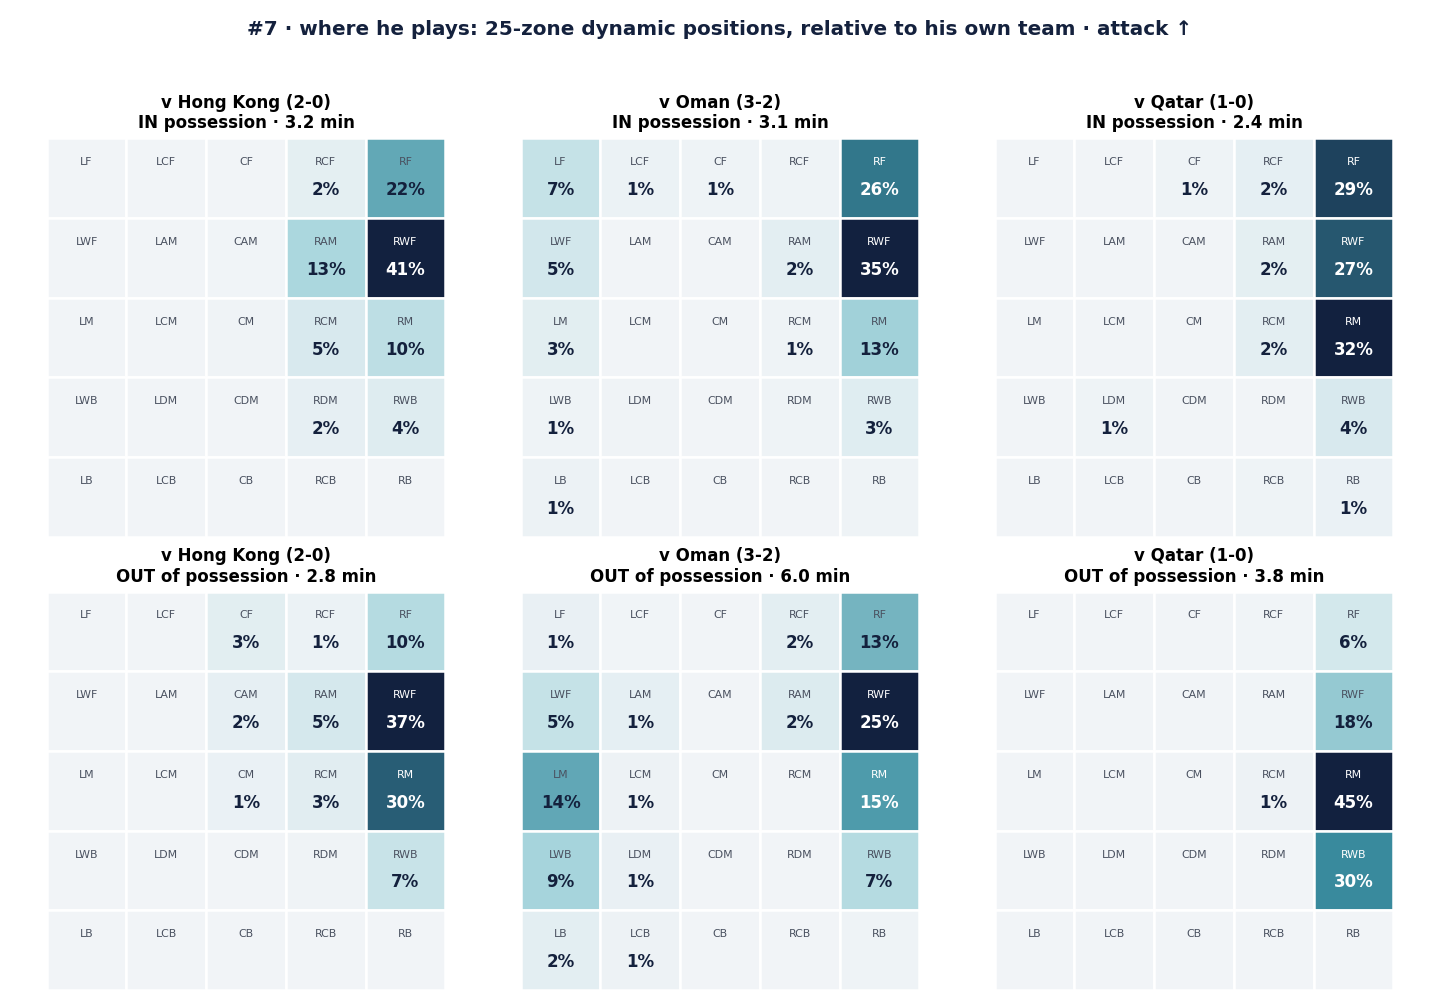
Left-footed inverted right winger. Against Hong Kong he kept width high on the right and scored before being substituted. Against Oman he moved left at the 30:43 cooling break and returned right after half-time. Against Qatar he held the right flank in the mid block but dropped to wing-back depth under Qatar's pressing spells (24-33', 45-55').
Passing and carrying, per match
| Match | Passes | Forward | Sideways | Back | Carries |
|---|---|---|---|---|---|
| Hong Kong | 14 | 36% | 27% | 36% | 7 |
| Oman | 7 | 0% | 50% | 50% | 8 |
| Qatar | 10 | 11% | 56% | 33% | 14 |
| All three | 31 | 19% | 42% | 38% | 29 |
Where his passes go
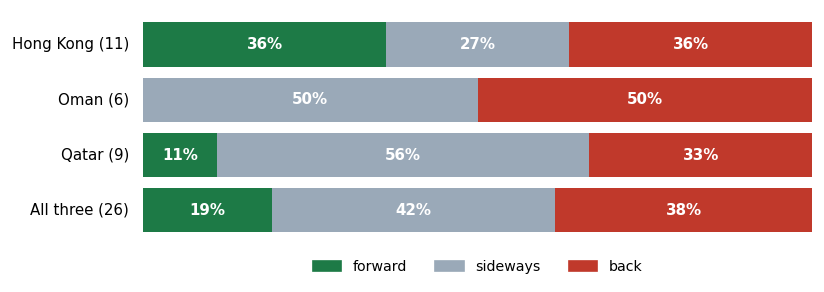
Counted on the video in his minutes on camera (not match totals); direction shares from the passes whose direction is visible.
How he reacted to each game
- Hong Kong · KSA 2-0
- In the high press (0-28') he stayed high and wide on the right: most of his watched moments, including the goal (27:07).
- When KSA pressed again after half-time he dropped deeper out of possession and his intensity fell before he went off (64:08).
- Oman · KSA 3-2 (away)
- Swapped to the left wing at the 30:43 cooling break; in that spell KSA reached the box about once per 10 minutes against Oman's 8.7, and the swap was reversed at half-time.
- When KSA pushed the press up (53:28) he pressed highest of the match, with his top intensity.
- From 73:32, when both teams changed, he added seven positive moments.
- Qatar · KSA 1-0
- Qatar's 2-4-4 press (24') pinned him back: deep out of possession and one positive moment in nine minutes.
- KSA's answer after the cooling break (33:17, wingers kept high) gave his best spell: eight positive moments and no negative one.
- In the KSA surge (55') and after Qatar's change (60:38) he received higher than at any other time before going off (66:16).
Where he plays · 25-zone dynamic positions
Passes and carries
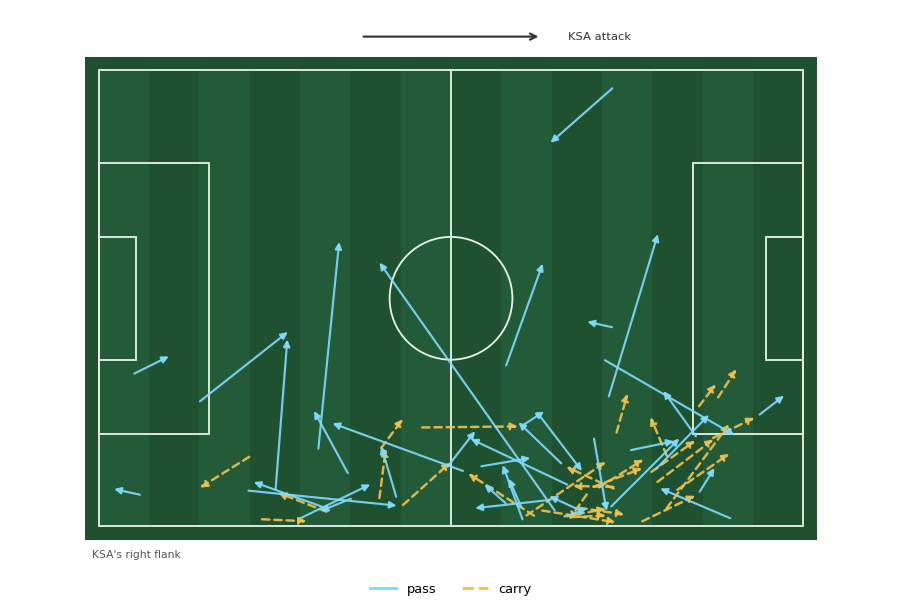
Where his passes and carries go (tracking).
Physical profile · rank in the KSA squad
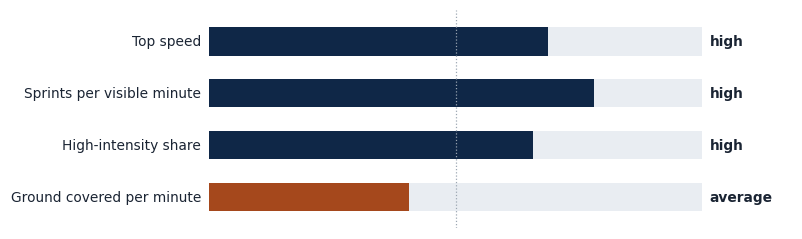
One of the quicker KSA players: near the top of the squad for top speed and sprint frequency; repeats long recovery runs (about 55 metres v Hong Kong).
The four corners
Tactical
Keep width / switch play. Provides a wide outlet on either flank (64:52 and 63:05 v Oman, 39:07 v Qatar), including as the far-side option for a switch up the right line through the press, received on the move (5:17 v Qatar).
Operate in between lines / support run. Receives between the lines facing goal when space opens (12:44 v Qatar) and makes support runs after releasing the ball (59:58 v Oman, 46:56 v Qatar).
Burst into space behind / time pass. Attacks the space behind towards the byline (45:49 v Oman) and times passes into runners (39:41 and 34:30 v Qatar, 37:45 v Hong Kong).
Out of possession and transitions. Tracks back along his flank and closes wide opponents (37:36 and 72:27 v Oman, 13:56 v Qatar), tracks a runner goal-side into his box (81:06 v Oman) and recovers quickly after high turnovers, including an approximately 55 m run (36:35 v Hong Kong).
To improve · move into traffic. Carries into crowded areas rather than releasing the ball (63:23 v Qatar, 67:37 v Oman).
To improve · plays with tunnel vision. Overlooks a free team-mate outside him (11:58 v Qatar).
Technical
Take on / go past. Faces up defenders and goes at them (48:06 v Hong Kong, 44:34 v Qatar, 94:41 v Oman), winning all 9 take-ons counted on video, with 29 carries in his minutes on camera.
Shield ball / ball retention. Keeps possession under pressure with a marker tight to him (43:21 and 34:07 v Qatar, 12:13 v Hong Kong).
Finishing. One goal from two shots. Against Hong Kong he takes a touch away from the defender before finishing from outside the box (27:07); one goal does not establish consistent finishing.
Passing. About nine in ten passes reach a team-mate (31 passes in about 68 minutes on camera), although most go sideways or back and only about one in five goes forward.
To improve · delivery. His byline delivery can fail to beat the first man (9:01 v Qatar).
To improve · control under pressure. Loses control while turning under contact near halfway, allowing Oman to break down his flank (36:21).
Physical
Speed and power. Among the squad's quickest for top speed and sprint frequency. Accelerates past a defender and stays on his feet through contact (20:11 v Hong Kong), and repeats long recovery runs.
Endurance. Covers an average distance per minute, with his high-intensity running declining late against Hong Kong before his substitution at 64:08.
Psychological
Confidence / self-belief. Repeatedly faces up defenders and takes them on (48:06 v Hong Kong, 44:34 v Qatar, 94:41 v Oman), and asks for the ball on the touchline with a marker tight on him (43:21 v Qatar).
Resilience / recovers after challenge. Re-engages at once after a challenge or dispossession and wins the ball back (21:33 and 6:17 v Qatar, 54:24 v Oman).
Poise and composure. Holds possession under contact before turning or releasing (34:07 v Qatar, 12:13 v Hong Kong), and takes a touch to set the shot for his goal (27:07 v Hong Kong).
Decision-making under pressure · to improve. Can move into traffic or miss an outside passing option (63:23 and 11:58 v Qatar, 67:37 v Oman), though he can also time his release into a runner (39:41 v Qatar).
Tactical · In Possession
Keeps width on either flank as the wide outlet and the far-side option for a switch of play, operates in between lines and makes support runs, bursts into space behind and can time pass / release the ball into a runner. To improve: he can move into traffic, and against Qatar plays with tunnel vision with a team-mate free outside him.
Provides a wide outlet on either flank, holding his position near the touchline to receive and support possession.
Clip descriptions
- Oman v KSA 64:52 · keep width: At 64:41, KSA attack down the left; the ball is worked across to the right and #7, keeping the width, collects it near the byline (64:48).
- KSA v Qatar 39:07 · keep width: At 39:07, #7 receives from #12 on the right touchline near halfway with a marker tight on him, keeps it and sets it inside to #6 (39:08).
- Oman v KSA 44:28 · keep width: At 44:28, #7 holds the ball on the left touchline in the Oman half with a marker coming and lays it back inside to #6 (44:32).
- Oman v KSA 63:05 · keep width: At 63:05, #8 plays the ball out to #7 on the right touchline, just inside the Oman half. #7 takes it in stride and carries it about 13 metres down the line with OMA#15 chasing (63:05-63:08).
Finds space between the opposition lines and makes forward support runs after releasing the ball.
Clip descriptions
- KSA v Qatar 12:44 · operate in between lines: At 12:44, #6 plays through the lines into #7. #7 receives between the lines facing goal, sets #12 free wide and attacks the box; when Qatar clear, he gets to the loose ball first at the edge of the area (12:49) and keeps the attack alive with #9.
- Oman v KSA 59:58 · support run: At 59:58, #7 receives #12's long ball on the right just short of halfway, lays it inside to #10 at once (60:01) and runs forward down the right; #10 returns it and #7 takes it in stride on the run in the Oman half (60:04). He carries it about 15 metres down the right at speed, then cuts inside towards the box, drawing OMA#19 and a second defender to him (60:07-60:08), and the ball reaches #14 in the box (60:09). OMA#3 gets to it with #14 and the Oman keeper gathers (60:10-60:11).
- KSA v Qatar 46:56 · support run: #7 sprints from his own half up the right (about 20 km/h, about 50 metres) and arrives at the edge of the Qatar box in support as #9, #10 and #14 work it across the edge of the area to the left (47:04-47:08); the ball does not come to him and Qatar win it (47:08-47:10).
Attacks space behind the defensive line, timing his forward movement to reach the ball near the byline.
Clip descriptions
- Oman v KSA 45:49 · burst into space behind: #7, already high on the right touchline, bursts onto it at full speed down the right channel (45:50-45:53) and gets to it at the byline inside the box with OMA#15 chasing him (45:54). The broadcast then cuts to a close-up of #7, and KSA restart with a corner on that side (46:29).
Recognises team-mates moving into space and releases the ball into their runs rather than continuing to carry it.
Clip descriptions
- KSA v Qatar 39:41 · time pass / release the ball: At 39:41, #7 receives on the right touchline in the Qatar half; as a defender comes to him he releases #14, who runs into the space inside him and on towards the box (39:42).
- KSA v Hong Kong 37:45 · time pass / release the ball: At 37:43, a KSA player slides in on an HK carrier in midfield and the ball runs loose; #7 gets to it first in the right half-space about 30 metres from goal (37:44-37:45). He carries at the HK defence and slips the ball forward into the run of a team-mate inside him (37:47), who gets into the box; the HK keeper comes out and gets down to stop it at his feet (37:48-37:49).
- KSA v Qatar 34:30 · time pass / release the ball: At 34:30, #7 takes #14's pass on the move on the right touchline just inside the Qatar half and runs with it about 25 metres down the line. At the corner of the box he faces QAT#3 and QAT#6 and pokes the ball inside past them (34:36); #9 gets to it in the box but is crowded out by three defenders (34:38-34:39).
Gives KSA the outlet on the far side of the press: the ball is switched up the right line to him and he takes it on the move into the opposition half.
Clip descriptions
- KSA v Qatar 5:17 · switch play: At 5:17, from the keeper, #6 shows for the ball at the edge of his box with Qatar pressing around him, takes two touches to open the angle and plays it about 25 metres up the right line to #7 (5:20), through the Qatar press. #7 takes it on the move near halfway and carries into the Qatar half along the line; the move ends by the touchline.
At times carries into crowded areas rather than releasing possession before additional defenders close the space. Against Qatar, he overlooks an available team-mate outside him.
Clip descriptions
- KSA v Qatar 63:23 · move into traffic: At 63:23, #7 picks up the ball near halfway in his own half on the right and drives forward at about 23 km/h, about 30 metres into the Qatar half. QAT#3 and a second defender meet him (63:27); he wins the first duel (63:29-63:30), but runs on into the two of them and Qatar come away with the ball by the end of the clip.
- Oman v KSA 67:37 · move into traffic: At 67:37, #7 has the ball on the right touchline just inside the Oman half and carries it about 22 metres down the line towards the box (67:37-67:47), picking up speed to 20 km/h as OMA#19 comes across. At the corner of the area he cuts inside between OMA#19 and a second defender; OMA#19 takes the ball off him (67:49-67:50) and Oman bring it out.
- KSA v Qatar 11:58 · plays with tunnel vision: At 11:58, #7 wins the ball from QAT#18 near the right touchline and powers through the right channel into the Qatar box. At the right side of the area #12 is free outside him; he cuts inside instead, is closed by three defenders and goes down (12:04) with the ball running loose: the lay-off or an early shot was on.
Tactical · Out Of Possession
Tracks back along his flank and is positioned to close space on wide opponents; tracks the runner goal-side to the edge of his own box.
Tracks back along his flank and closes down wide opponents, helping restrict their progress towards the box.
Clip descriptions
- Oman v KSA 37:36 · track back: #7 tracks back about 15 metres (up to 18 km/h) and, with a team-mate, closes him near the corner of the KSA box; #7 gets a foot to the ball (37:38), and OMA#8 has to turn back and play it out to OMA#18 (37:40), away from the KSA box.
- KSA v Qatar 13:56 · track back: At 13:56, Qatar break down KSA's right; #7 tracks back and closes QAT#3 near the touchline in his own half, with #6 covering the space inside, until play stops (13:59).
- KSA v Qatar 2:15 · track back: At 2:15, KSA lose it on the touchline; #7 tracks back from halfway and closes the Qatar carrier, but Qatar keep moving it (2:18).
- KSA v Qatar 65:00 · track back: At 64:59, QAT#18 carries down KSA's right touchline from about halfway with #7 on him. #7 stays with him for about 15 metres and gets the ball off him three times (65:00, 65:01, 65:04), but cannot keep it each time and QAT#18 takes it back (65:05). The run down the line ends there: Qatar play it back infield (65:08).
- Oman v KSA 72:27 · track back · positioned to close space: At 72:27, Oman play it wide to OMA#18, but #7 has tracked back into his own half and is touch-tight on him (72:27-72:30), so the ball has to come back to OMA#13.
- KSA v Hong Kong 32:06 · track back: At 32:06, the ball runs loose towards the byline and HKG#2 gets to it first; #7 chases him down and slides in by the corner (32:07-32:08), and the ball goes out of play (32:09).
Tracks an opposition runner over a long distance, remaining goal-side as the attack approaches his own penalty area. The positioning is right, although the opponent still delivers the ball across goal.
Clip descriptions
- Oman v KSA 81:06 · track runner: #7 turns and tracks back about 35 metres alongside OMA#16, staying goal-side of him all the way to the right corner of the KSA box (81:04-81:08). There (81:09) he slides in, but OMA#16 gets the ball away first, low across towards the near post; it goes out just beside the post (81:12) and the Oman players put their hands on their heads.
Tactical · Transitions
Takes up a recovery position with long runs back into the channel between the carrier and his own box.
Reacts to opposition transitions with long recovery runs, getting back into the channel between the ball carrier and his own penalty area.
Clip descriptions
- KSA v Hong Kong 36:35 · recovery position: #7 is caught high in the Hong Kong half and turns at once: he runs back about 55 metres (36:35-36:47), at 20-23 km/h most of the way, straight down that right channel. When HK have the ball by the KSA corner flag (36:43), he arrives in the channel outside the KSA box, about 12-15 metres from the ball, closing the space for the pass back along the touchline while KSA defenders deal with the carrier; play stops at 36:48.
- KSA v Hong Kong 21:10 · recovery position: #7 turns from the Hong Kong half and runs back about 45 metres at up to about 23 km/h (21:08-21:15). HKG#17 carries down KSA's right touchline; #7 arrives on his inside, in the space between him and the KSA box (21:14). Hong Kong play it inside and KSA win it back in front of their box (#8, 21:18).
Technical
Finishing (the goal v Hong Kong), shield ball / ball retention under pressure, take on / go past. To improve: fail to beat the first man from the byline, and poor control under pressure when turning in contact.
Takes a touch away from the defender to create shooting space and finishes from outside the box. One goal; on its own it does not show consistent finishing.
Clip descriptions
- KSA v Hong Kong 27:07 · finishing · the goal v Hong Kong: At 26:55, KSA switch the play from the centre-left to #7, who has kept the width and is free on the right touchline just short of the Hong Kong box (26:58). He carries inside towards the corner of the box; an HK defender gets touch-tight on him (27:00), so he turns back inside and lays it off to #18 (27:02). #18 is challenged and the ball comes back to #7 just outside the right side of the box (27:05). He takes one touch away from the defender who lunges in and strikes, from about 25 metres (27:06); the keeper dives but cannot reach it and the ball is in the net (27:07). KSA lead 1-0. The tracking labels the lay-off player KSA#10, but the shirt on screen is #18.
Uses his body to protect possession with opponents close, holding the ball before turning away or releasing it to a team-mate.
Clip descriptions
- KSA v Qatar 2:30 · shield ball: At 2:30, #7 drops deep to collect on the right touchline in his own half, shields the ball with a marker close and carries it forward along the line before KSA switch the play to #13 on the far side (2:36).
- KSA v Qatar 43:21 · shield ball: At 43:21, #7 receives from #12 on the right touchline in his own half, shields it from his marker for about six seconds, turns inside and plays it infield (43:27).
- KSA v Hong Kong 12:13 · ball retention under pressure: At 12:12, #18 plays it inside from the right touchline to #7 just inside the Hong Kong half (12:13). He receives facing his own goal with an HK player chasing him, keeps it while moving back towards halfway (12:14-12:16), then turns and plays it forward infield to a team-mate (12:17), who is challenged at once; both players go down (12:18).
- KSA v Qatar 34:07 · shield ball: When it breaks loose near halfway on the right, #7 gets to it first (34:07), shields it from his marker for about six seconds and keeps it, then the ball goes back to #6 (34:14).
- KSA v Qatar 26:55 · shield ball: At 26:52, #7 has tracked back to the edge of his own box on the right and receives from #12. QAT#11 attacks him; #7 shields the ball and holds him off in a long duel (26:55-26:56) and the ball reaches #3 by the KSA byline (26:58).
- KSA v Qatar 46:30 · ball retention under pressure: At 46:30, after KSA win it near their box, #7 receives on the right touchline with a marker tight on him and holds it.
Willing to face up defenders and carry towards them, using changes of direction to challenge opponents and occasionally progress past the first defender. The clips show the attempts, not three completed take-ons.
Clip descriptions
- KSA v Hong Kong 48:06 · take on / go past: At 48:02 (first-half stoppage, KSA 1-0 up), #7 receives on the right just outside the Hong Kong box with a defender in front of him. He faces him up, works the ball for a few seconds, then goes at the corner of the box; HKG#20 slides in and #7 rides the challenge and stays on his feet into the box (48:06-48:08). A second defender (HKG#22) comes across and blocks him near the byline (48:09); the ball runs out to the edge of the box and Hong Kong clear it.
- KSA v Qatar 44:34 · commit defender: At 44:34, #7 receives from #3 on the right in the Qatar half, runs at QAT#17 and carries inside along the edge of the area; as he cuts inside, QAT#17 brings him down with a sliding challenge (44:40) and the broadcast then shows QAT#17 being booked.
- Oman v KSA 94:41 · commit defender: At 94:41, #7 receives from a throw-in on the right touchline in the Oman half. He turns infield and carries towards the right corner of the Oman box (94:42-94:44), takes on two Oman defenders near the byline and goes down between them (94:45-94:46); the ball runs on towards the corner. KSA are 3-2 up in stoppage time.
Reaches the byline but fails to deliver the ball beyond the first defender.
Clip descriptions
- KSA v Qatar 9:01 · fail to beat the first man: At 9:01, #7 receives wide right in the final third, commits QAT#3 and gets to the byline inside the box; his ball across fails to beat the first man and he keeps fighting for it on the line (9:07-9:09) before Qatar scramble it clear.
Loses control while turning under contact near halfway, allowing Oman to regain possession and attack down his flank.
Clip descriptions
- Oman v KSA 36:21 · poor control under pressure: At 36:21, KSA win the ball in their half and it is played out to #7 on the left touchline just inside his own half, with a marker on his back. He controls it and turns, but the ball runs a few metres away from him in the contact and Oman win it near halfway (36:22). Oman then break down the KSA left, the zone #7 has just lost the ball in, with OMA#8 carrying towards the KSA box (36:25-36:26); #7 runs back after him at about 22 km/h.
Physical
Power through: pace and power past a defender, staying on his feet through the challenge.
Shows pace and power when attacking space, accelerating alongside a defender, getting past him and staying on his feet through the challenge.
Clip descriptions
- KSA v Hong Kong 20:11 · power through: #7 bursts into that space, runs about 20 metres at up to about 26 km/h and gets to the ball first, side by side with HKG#2 (20:11-20:13). He powers past him; #2 slides in and ends up on the ground while #7 stays on his feet with the ball near the byline (20:14-20:15). He works it along the line towards the corner of the box and plays it into the crowded six-yard area (20:18); it is not clear on screen who touches it next, and the score stays 0-0.
Psychological
Recovers after challenge: when challenged or dispossessed he re-engages at once and wins the ball back.
Responds immediately when challenged or dispossessed, re-engaging in the duel and regaining possession rather than withdrawing from the action.
Clip descriptions
- KSA v Qatar 21:33 · recovers after challenge: At 21:33, KSA switch the play to #7 wide right in the final third. He takes it on the move and runs at QAT#3 at the edge of the box; the ball is knocked loose, but #7 wins it back with #12 overlapping (21:36-21:39) and pushes it down the line to the byline (21:42). There he goes to ground in the duel with a Qatar defender, no cross comes, and Qatar clear (21:43-21:46).
- Oman v KSA 54:24 · recovers after challenge: At 54:24, #7 receives on the right touchline in the Oman half with a defender at his back, turns away from him and carries down the line past two Oman players towards the corner of the box (54:25-54:29). OMA#19 takes the ball off him there (54:30) and heads for the corner flag, but #7 goes straight after him and wins it back in the duel by the line (54:32). He then carries it infield along the edge of the area at speed (54:33-54:37), into a group of Oman players; OMA#7 gets a first touch on it (54:36), #7 holds on briefly, and OMA#7 takes it from him at 54:40.
- KSA v Qatar 6:17 · recovers after challenge: At 6:17, #7 gets to the second ball from the Qatar keeper's kick near halfway and drives forward at pace into the Qatar half. He commits QAT#3 and #20, loses it, wins it back with a second effort (6:20-6:21), but #3 finally takes it.